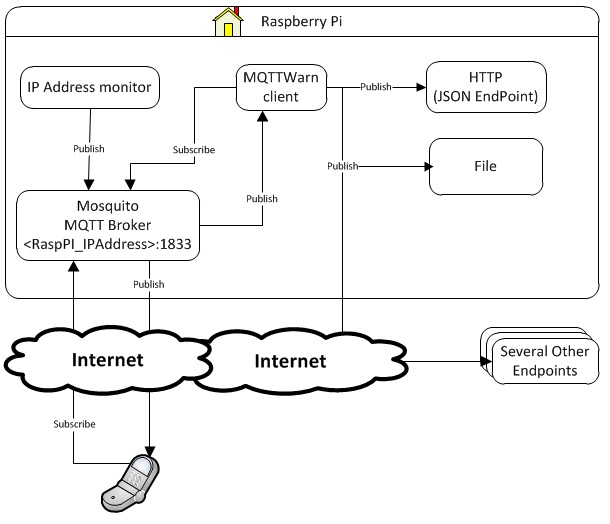
So there are numerous post out there for MQTT implementation. I recently did a POC at work, and I wanted to keep a list of things I need to know if I wanted to return or do more with MQTT. Hence this post.
MQTT
MQTT is a machine-to-machine (M2M)/"Internet of Things" connectivity protocol. It was designed as an extremely
lightweight publish/subscribe messaging transport. It is useful for connections with remote locations where a small code footprint is required and/or network bandwidth is at a premium.
Demo Architecture

Installing software
Installing Node.JS
Please follow the instructions to install nodejs. After that, install some modules using the Node Package Manager:
1
| |
If you want to debug or auto-reload of the script, also install nodemon:
1
| |
Installing MQTT Broker - Mosquitto (or Checkout HiveMQ)
Source: http://jpmens.net/2013/09/01/installing-mosquitto-on-a-raspberry-pi/
1 2 3 4 5 6 | |
Now go ahead and install Mosquitto proper. There are three packages:
-Mosquitto is the MQTT broker (i.e. server)
-mosquitto-clients are the command-line clients, which I recommend you install
-python-mosquitto are the Python bindings, which I also think you should install all three packages together require about 665Kb of space, which we can easily afford even on the tiny Pi.
1
| |
Mosquitto/'s default configuration means it is set up to not use username/password authentication and accepts all connections on port 1883. It also comes with two clients, mosquitto_pub and mosquitto_sub, the latter of which will be useful when you are debugging your applications. Running:
1
| |
will dump all new messages to the broker. Remember the quotes around the topic, especially with the "#" wildcard on Unix as, unquoted or unescaped, that marks the start of a comment and would see the rest of the command discarded. If you leave that command running and, in another window, run
1
| |
then you should see the mosquitto_sub session list the message.
Installing MQTT Client - MQTTWarn
This program subscribes to any number of MQTT topics (which may include wildcards) and publishes received payloads to one or more notification services, including support for notifying more than one distinct service for the same message.
For example, you may wish to notify via e-mail and to Pushover of an alarm published as text to the MQTT topic home/monitoring/+.
Full Info here
Requirements
You'll need at least the following components:
-Python 2.x (tested with 2.6 and 2.7)
-An MQTT broker (e.g. Mosquitto)
-The Paho Python module: pip install paho-mqtt
Installation
-Clone this repository into a fresh directory.
1
| |
-Copy mqttwarn.ini.sample to mqttwarn.ini and edit to your taste
-Install the prerequisite Python modules for the services you want to use
-Launch mqttwarn.py
MQTT Android Client
Android Service
The Paho Android Service is an interface to the Paho Java MQTT client library that provides a long running service for handling sending and receiving messages on behalf of Android client applications when the applications main Activity may not be running.
The Paho Android Service provides an asynchronous API
Source:
http://git.eclipse.org/c/paho/org.eclipse.paho.mqtt.java.git/
Check out Paho project here
All you need to get started is:
1 2 3 4 5 6 | |
Test Broker Setup
To test your Broker setup you can install MyMQTT from google play.
In few days I am gonna write myself a post about Google Cloud Notification service (GCM). The easiet notification service for Android notifications.
That's all folks. Have Fun.
